
 With the start of the holiday season I’ve been thinking about what I love about each of the holidays. The things that tie them all together for me are the people and traditions. Now, more than ever, I’m wanting to connect with my friends and family. Our little traditions mean a lot. I’m embracing the little things and wanting to share more joy. One way I can do that, is to do more of what I love, making and sending cards. I hope you join me in sharing connection and joy with those you care about throughout the upcoming holidays! This month’s tutorial is perfect for making a bunch of cards without spending a lot of time, so it’s a real win-win in my book. The Tag Buffet Project Kit is easy to dismiss as just tags, but I think you’ll see it can be so much more! If you would like to join me in making these great Christmas Cards, along with Tags, 3 gift boxes, and 2 gift card holders. I am happy to host a Christmas Card Class using the Tag Buffet Project Kit for you and two of your friends in my home studio, just contact me with a date that works best for you. I pray you will stay safe and be well! And As Always… Make someone smile today. Give the gift of something handmade and heartfelt! Inky OXOX, Jayne New HOST CODE VXFHEG66 Thanks for using the Host code for your online order. If your order is $150 before tax and shipping do not use the host code, you will earn free Stampin’ Up product. I have a Stampin’ Up Store where you can purchase Stampin’ Up products 24/7. I value your business, my clients mean the world to me, most are dear friends.Tag Buffet Tags Step-Up to Create Cards 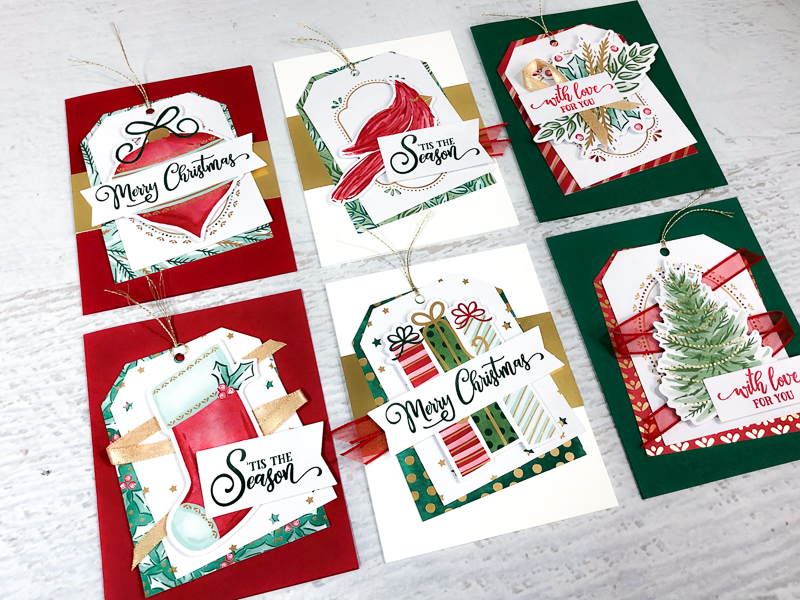 It’s always fun to take something and re-purpose it to something else. The Tag Buffet Project Kit is ideal for this. This kit is an awesome value, it includes 30 tags, 5 each of 6 designs and a sturdy designer box for storing or gifting. These tags are big, detailed, and have gold foil accents, which makes them perfect for converting them into the focal point on cards. It’s always fun to take something and re-purpose it to something else. The Tag Buffet Project Kit is ideal for this. This kit is an awesome value, it includes 30 tags, 5 each of 6 designs and a sturdy designer box for storing or gifting. These tags are big, detailed, and have gold foil accents, which makes them perfect for converting them into the focal point on cards.In this tutorial I’ll share how to create a card for each of the 6 tag designs. You can mix and match tags and cards so that you give a gift with a coordinating tag and card, or you can make all 30 of the tags into cards, it’s up to you! SUPPLIES for 6 cards, one each of 6 designs: Kit: Tag Buffet (#153649) Stamps: Tag Buffet (#153612) Ink: Real Red (#147084), Shaded Spruce (#147088) Paper : 1-Thick Whisper White cardstock (#140272), 1-Whisper White cardstock (#100730), 1-Real Red cardstock (#102482), 1-Shaded Spruce cardstock (#146981), 1/6 sheet-Gold Foil Sheets (#132622) Embellishments: 20″-Real Red 3/8″ Sheer Ribbon (#153535), 20″-Gold 1/4″ Shimmer Ribbon (#152156) Adhesives: Stampin’ Dimensionals (#104430), Mini Glue Dots (#103683), Stampin’ SEAL (#152813) Step-up Options: Step the the design even more with self-adhesive Wonderful Gems (#153536), stamp the card bases with images from the Tag Buffet stamp set, or emboss the card bases with the Winter Snow Embossing Folder (#153577) 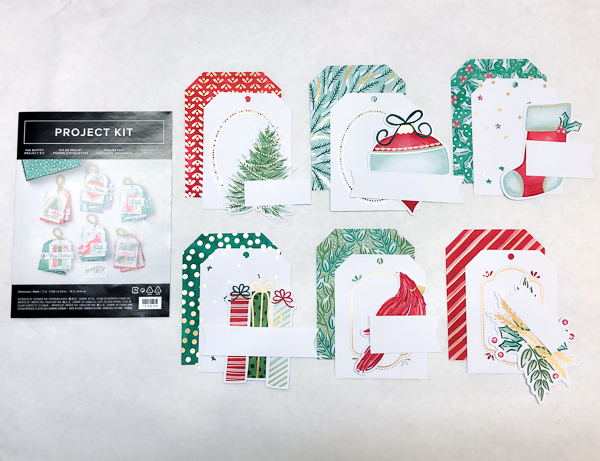 1. Sort Tag PiecesSort out your Tag Buffet tag, image, and label pieces just like is shown in the instructions included with the kit. Supplies listed above are for 6 cards, if you want to make more just add up the supplies. 1. Sort Tag PiecesSort out your Tag Buffet tag, image, and label pieces just like is shown in the instructions included with the kit. Supplies listed above are for 6 cards, if you want to make more just add up the supplies.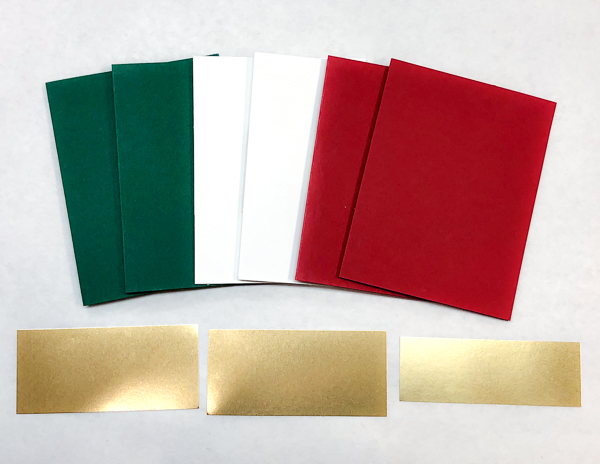 2. Cut & ScoreCut two 5-1/2″ x 8-1/2″ card bases each from Real Red, Shaded Spruce, and Thick Whisper White cardstock. Score each at 4-1/4″ along the 8-1/2″ side. Cut Gold Foil Sheet to create two 2″ x 4-1/4″ pieces and one 1-1/2″ x 4-1/4″ piece. 2. Cut & ScoreCut two 5-1/2″ x 8-1/2″ card bases each from Real Red, Shaded Spruce, and Thick Whisper White cardstock. Score each at 4-1/4″ along the 8-1/2″ side. Cut Gold Foil Sheet to create two 2″ x 4-1/4″ pieces and one 1-1/2″ x 4-1/4″ piece.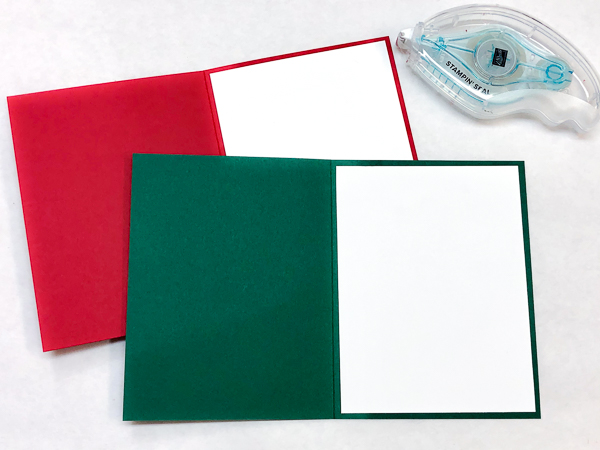 3. Add Inside LayersCut four 4″ x 5-1/5″ pieces of Whisper White cardstock. Adhere one inside each Real Red and Shaded Spruce card as a writing area. 3. Add Inside LayersCut four 4″ x 5-1/5″ pieces of Whisper White cardstock. Adhere one inside each Real Red and Shaded Spruce card as a writing area.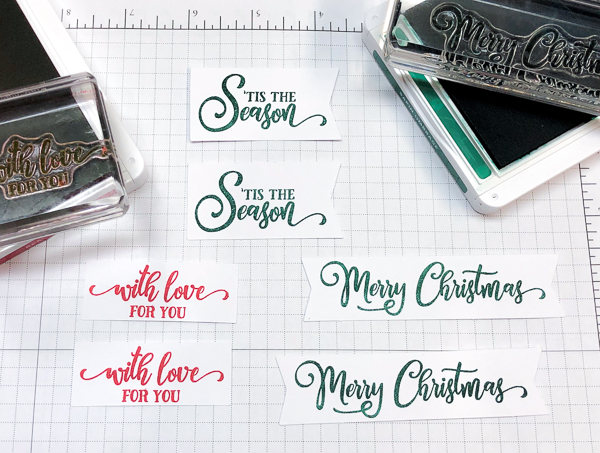 4. Stamp GreetingsStamp greetings from the Tag Buffet stamp set onto the tag labels as shown using Real Red and Shaded Spruce ink. 4. Stamp GreetingsStamp greetings from the Tag Buffet stamp set onto the tag labels as shown using Real Red and Shaded Spruce ink.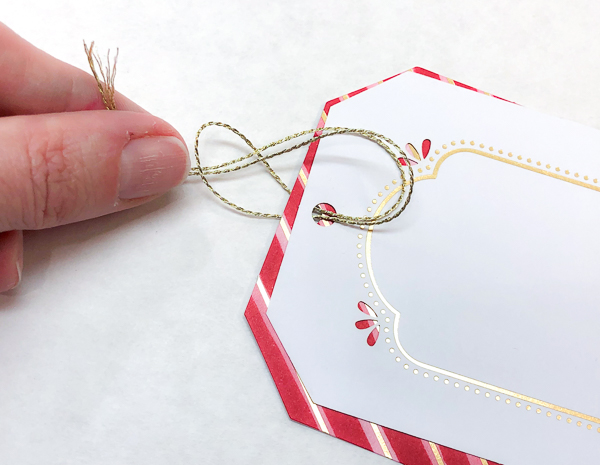 5. Add Gold TrimCut 6 pieces of Gold Trim to 8″ each. Stack the 2 tag layers for each tag with the holes aligned. Fold trim in half and thread folded end through the holes. Thread the trim ends through the loop in the trim and pull snug. 5. Add Gold TrimCut 6 pieces of Gold Trim to 8″ each. Stack the 2 tag layers for each tag with the holes aligned. Fold trim in half and thread folded end through the holes. Thread the trim ends through the loop in the trim and pull snug.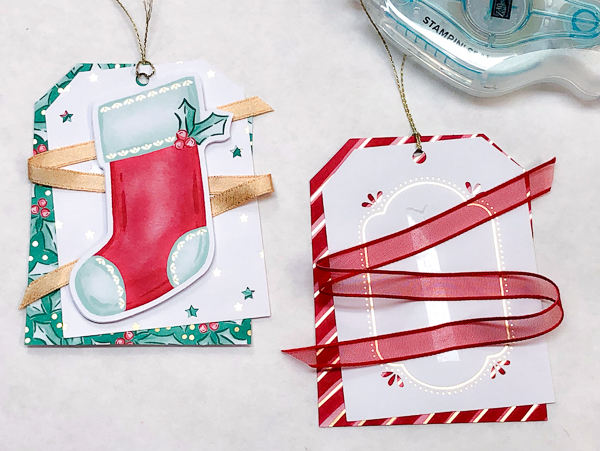 6. Add Ribbon Zig ZagFor the stocking and tree tags, cut 12″ piece of the Gold Shimmer and Real Red Sheer ribbons. Add a stripe of Stampin’ SEAL down the center of the white tag layer. Lay the ribbon across the tag in a zig zag starting at the top right and ending at the bottom left. 6. Add Ribbon Zig ZagFor the stocking and tree tags, cut 12″ piece of the Gold Shimmer and Real Red Sheer ribbons. Add a stripe of Stampin’ SEAL down the center of the white tag layer. Lay the ribbon across the tag in a zig zag starting at the top right and ending at the bottom left.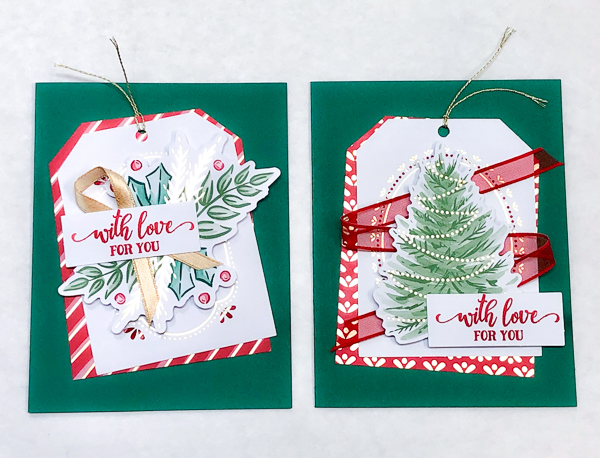 7. Shaded Spruce CardsGather the Shaded Spruce cards. Add the tags at an angle using Stampin’ Seal. Add the greenery and tree images with Stampin’ Dimensionals. Use 6″ of Gold Shimmer ribbon to create a crossed ribbon. Adhere to card with Glue Dots. Add greetings to both cards. 7. Shaded Spruce CardsGather the Shaded Spruce cards. Add the tags at an angle using Stampin’ Seal. Add the greenery and tree images with Stampin’ Dimensionals. Use 6″ of Gold Shimmer ribbon to create a crossed ribbon. Adhere to card with Glue Dots. Add greetings to both cards.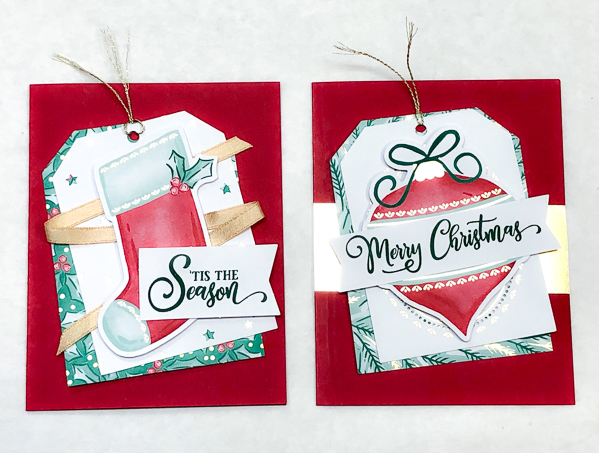 8. Real Red CardsGather the Real Red cards. Adhere the 1-1/2″ x 4-1/4″ Gold Foil strip across one. Add the tags at an angle using Stampin’ Seal. Add the stocking over the ribbon zig zag and the ornament to the other with Stampin’ Dimensionals. Add greetings to both cards. 8. Real Red CardsGather the Real Red cards. Adhere the 1-1/2″ x 4-1/4″ Gold Foil strip across one. Add the tags at an angle using Stampin’ Seal. Add the stocking over the ribbon zig zag and the ornament to the other with Stampin’ Dimensionals. Add greetings to both cards.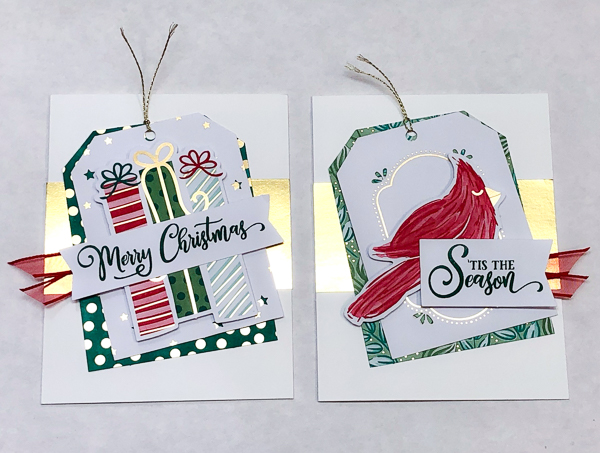 9. Whisper White CardsGather the Whisper White cards. Adhere a 2″ x 4-1/4″ Gold Foil strip across each one. Add the tags at an angle using Stampin’ Seal. Add the cardinal and gifts with Stampin’ Dimensionals. Cut two 4″ pieces of Real Red Sheer ribbon. Fold in a “V” and adhere behind one of of each greeting label with Glue Dots. Add greetings to both cards.SuppliesTag Buffet Project Kit 9. Whisper White CardsGather the Whisper White cards. Adhere a 2″ x 4-1/4″ Gold Foil strip across each one. Add the tags at an angle using Stampin’ Seal. Add the cardinal and gifts with Stampin’ Dimensionals. Cut two 4″ pieces of Real Red Sheer ribbon. Fold in a “V” and adhere behind one of of each greeting label with Glue Dots. Add greetings to both cards.SuppliesTag Buffet Project KitMORETag Buffet stamp set MOREReal Red 3/8″ Sheer Ribbon MORESpecialsAbout Me Jayne HansenSee Jayne Stamp Baltimore, Maryland, USA 410-705-4262 jaynefhansen@gmail.com www.seejaynestamp.comVISIT MY SITEYou have received this email because you have subscribed to my newsletter list, purchased products from me, or attended an event I hosted. If you no longer wish to receive emails please unsubscribe using the link below. © CraftyPerson Productions | Images © Stampin’ Up! | All Rights Reserved |
-
Shop Now
Picture goes Here
Follow Me


Search
Subscribe
Recent Posts
Archives
Categories
Copyright and Disclaimer Notice
All images are Copyright Stampin’ Up! 1990 to 2016, unless otherwise stated. The use of images and all content is the sole responsibility of Jayne Hansen Independent Stampin’ Up! Demonstrator.